Tags
The cloud providers cost management pillars provide tools that cover many aspect of your cloud spending, like billing isolation, specific service limits and cost alerts. There are also 3rd party tools out there that provide enhanced functionality, such as inventory visibility, rightsizing recommendations, idle resources detection etc.
All of these are great tools. However, to get valuable insights, this is simply not enough. The key to really understanding where your budget is spent requires the use of accurate tagging.
- Tags apply to AWS, Azure and Google Cloud.

(https://aws.amazon.com/blogs/apn/how-to-optimize-your-aws-workload-cost-with-capgemini-and-virtana/)
Proper and consistent resource tagging is difficult, especially since some resources are automatically created, and others manually, by different teams, in different geographic locations, through different stages of the development pipeline.
The solution is to do it the Stack Automation way. In other words, tag deployments rather than single resources. A whole deployment is what makes the business sense and helps you to really understand the data. Using Stack Automation tagging capabilities, you can be sure you are covered, enforce your own tagging policy, and make sure any deployment is tagged correctly, with the tags that you need.
There are 3 types of tags in Stack Automation - System tags, built-in tags, and custom tags:
System Tags
Stack Automation creates several tags out of the box to help with your cloud book keeping:
- sandbox-name : the name that was given to the deployment
- blueprint-name : the template which the deployment was built from
- space-name : the name of the space
- owner-email : email of the user who deployed it
Stack Automation will automatically tag all cloud resources with these tags as the name and will also populate the tag value.
Built-in Tags
The activity_type tag comes built-in when launching a deployment as a drop-down input. The end-user who is launching the deployment sets the tag's value, which defines the purpose of the deployment. The end-user can choose from a list of pre-defined values such as dev, test, demo... etc. while the account admin can also edit this list and add more business activities to this tag.
Stack Automation System Tags Reference
The following table describes the system tags automatically applied to all deployment resources:
| Tag Name | Scope | Description | Example Value |
|---|---|---|---|
torque-account-id | Deployment | Unique identifier for the Stack Automation account | vc8b2202-55ff-45ea-adfc-5be5509caea2 |
torque-env-case-ignored-id | Deployment | Deployment identifier (case-insensitive) | kc3dyud8kb8rccukgjbo |
torque-environment-id | Deployment | Unique identifier for the deployment instance | Rr0LgPNF2j2C |
torque-owner-email | Deployment | Email address of the user who created the deployment | user@quali.com |
torque-blueprint-name | Deployment | Name of the blueprint used to create the deployment | /VC-Win2012-TemplateVM |
torque-space-name | Deployment | Name of the Stack Automation space containing the deployment | O3-Live |
torque-sandbox-name | Deployment | Custom name given to the deployment instance | Win2012 Template VM |
Automatic Tagging All these tags are automatically applied by Stack Automation to every cloud resource created within a deployment. This ensures consistent tracking and cost allocation across your entire infrastructure.
To customize the activity_type tag:
- Under Governance click Tags.
- Edit the activity_type tag.
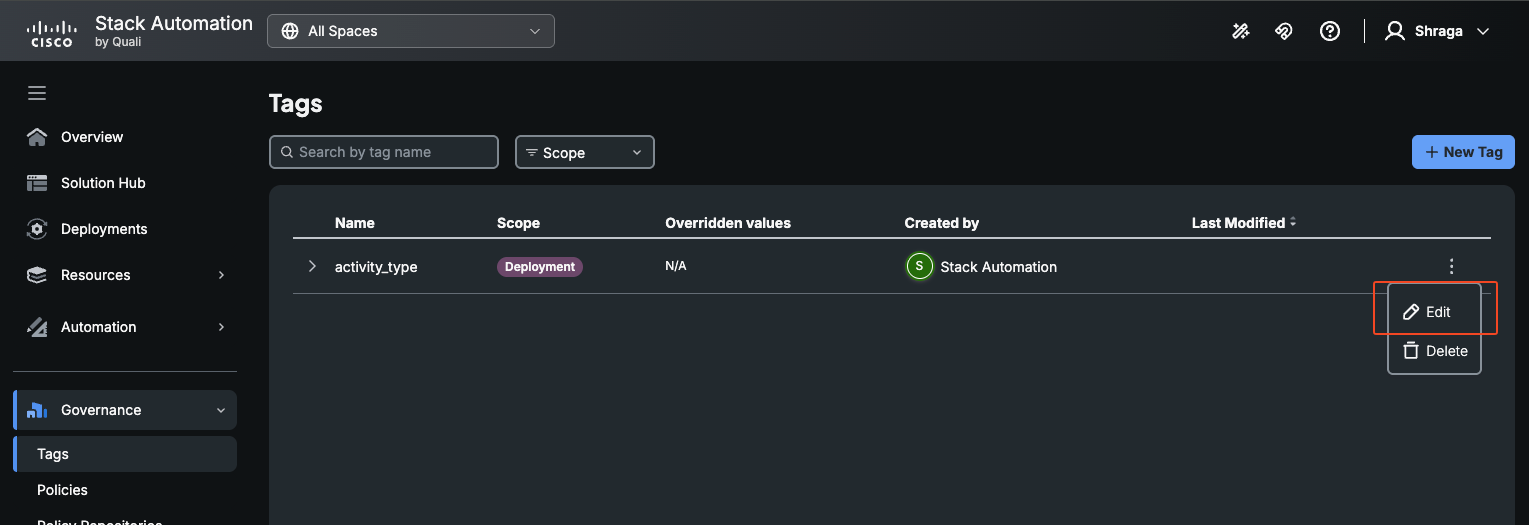
-
You can change the default value, possible values and description.
-
Click Apply.
Custom Tags
Custom tags are tags that are completely defined by you according to your policy and needs. You will define both the tag name and value. The Stack Automation account admin creates the custom tags, and defines their name, default value, and scope. The scope determines who will define their final value, and when.
Stack Automation defines 4 scopes for custom tags: account, space, blueprint, and sandbox.
- account scope: The tag's value is set once during the tag's creation by the account admin. The tag's value will be identical for all resources in all deployments.
- space scope: The tag's default value is set during the tag's creation, but it can be overridden with separate value on each space by the space admin. All resources created by all deployments in the same space will have the same tag value.
- blueprint scope: The tag's default value is set during the tag's creation, but it can be overridden with separate value on each blueprint by the blueprint developer. All resources created by deployments using this blueprint will have the same tag value.
- sandbox scope : The tag's default value is set during the tag's creation, but it can be overridden with a separate value by the end user when they start a deployment.
- Any custom tag will be applied to all resources created in all deployments in this Stack Automation account. If its value was not overridden in its defined scope it will be deployed with the default value.
- Stack Automation supports a maximum of 20 custom tags.
Possible Values for custom tags
As the account admin, when you create a custom tag you can limit the allowed values which the other users will be able to use to a closed list of possible values. When the user would override the tag's value they will see a dropdown list of the possible values that the account admin defined, and will only be able to select one of these values.
Creating a custom tag
- Open Administration and click Tags.
- click + New Tag and follow the instructions.
Overriding a custom tag's default value
- Space Scope: Go to the space settings page --> Tags and select the tag value which you wish to override.
- Blueprint Scope: Go to the blueprints page, and click on the ... menu for the blueprint you which to override the tag. Click on Manage Tags.
- Sandbox Scope: When you launch a deployment, you will see in the tags section the Sandbox scope tags and you will be able to override it.