Install the Stack Automation Management Server
A management server (also referred to as an agent) is the component that communicates with your Stack Automation tenant and creates the required deployment resources. It executes, manages, and monitors the workloads that Stack Automation deploys on your behalf.
This quick-start guide walks you through the fastest path to get Stack Automation up and running: connecting a single management server. Unlike blueprint-driven onboarding, a management server does not require a space or a repository — you can install it on its own and associate it with spaces and repositories later.
In this guide we will cover:
- Where a management server can be installed (cloud or on-premises)
- Generating the deployment for your management server
- Installing the management server and verifying that it is connected
- (Optional) Associating the management server with a space and launching blueprints from a repository
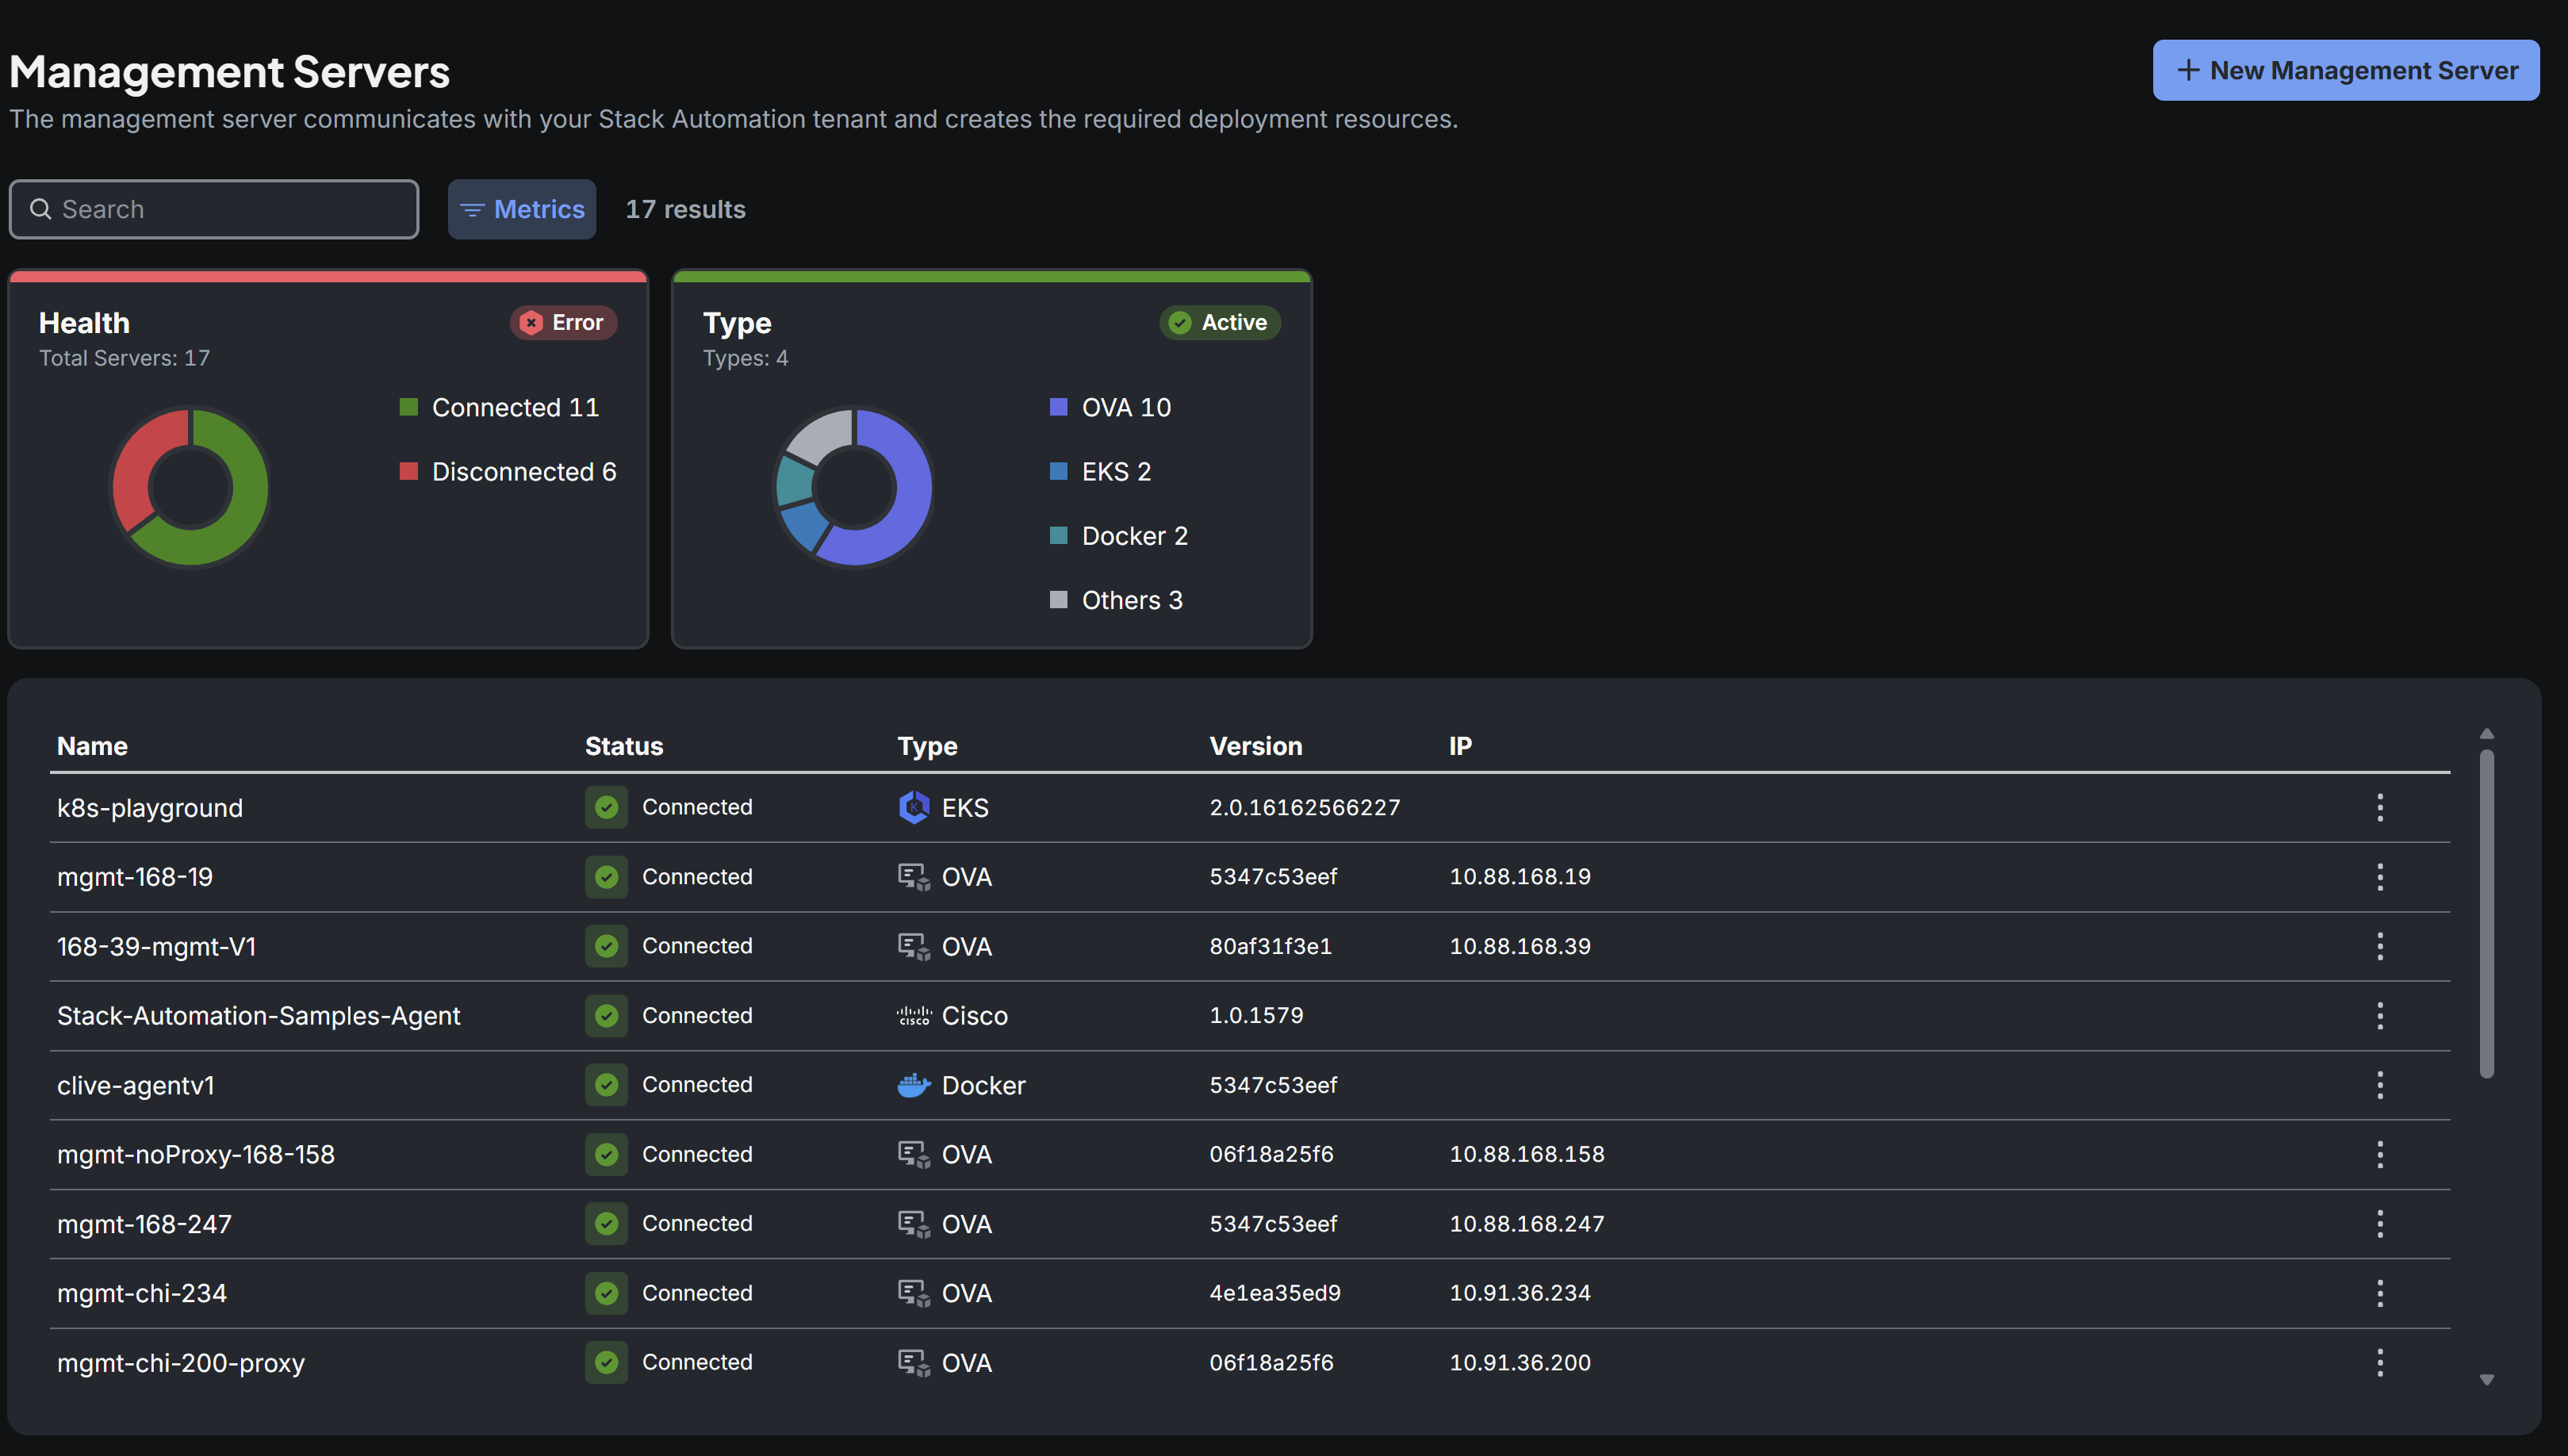
The management server is a lightweight orchestration component deployed in your own environment. Once connected, it appears in Resources → Management Servers, where you can monitor its health (Connected / Disconnected), type, version, and IP. Stack Automation supports several management-server types, including virtual machine images (OVA), managed Kubernetes (for example EKS), Docker, and self-managed Kubernetes.
Step #1: Open the Management Servers page
- Navigate to Resources → Management Servers.
- Review the list of existing management servers. The page shows an at-a-glance Health and Type breakdown, plus a table with each server's Name, Status, Type, Version, and IP.
- Click New Management Server in the top-right corner to open the Connect a Management Server wizard.
Step #2: Choose where to install (Setup)
In the Setup step, select where you would like to install your management server:
| Option | Description |
|---|---|
| Cloud | Install into a public or GPU cloud. After choosing this option, select Public Cloud or GPU Cloud. |
| On-Premises | Install as a virtual machine (VM) in your own datacenter. After choosing this option, select the VM type and then the hypervisor: VMWare, Redhat KVM, or Nutanix. |
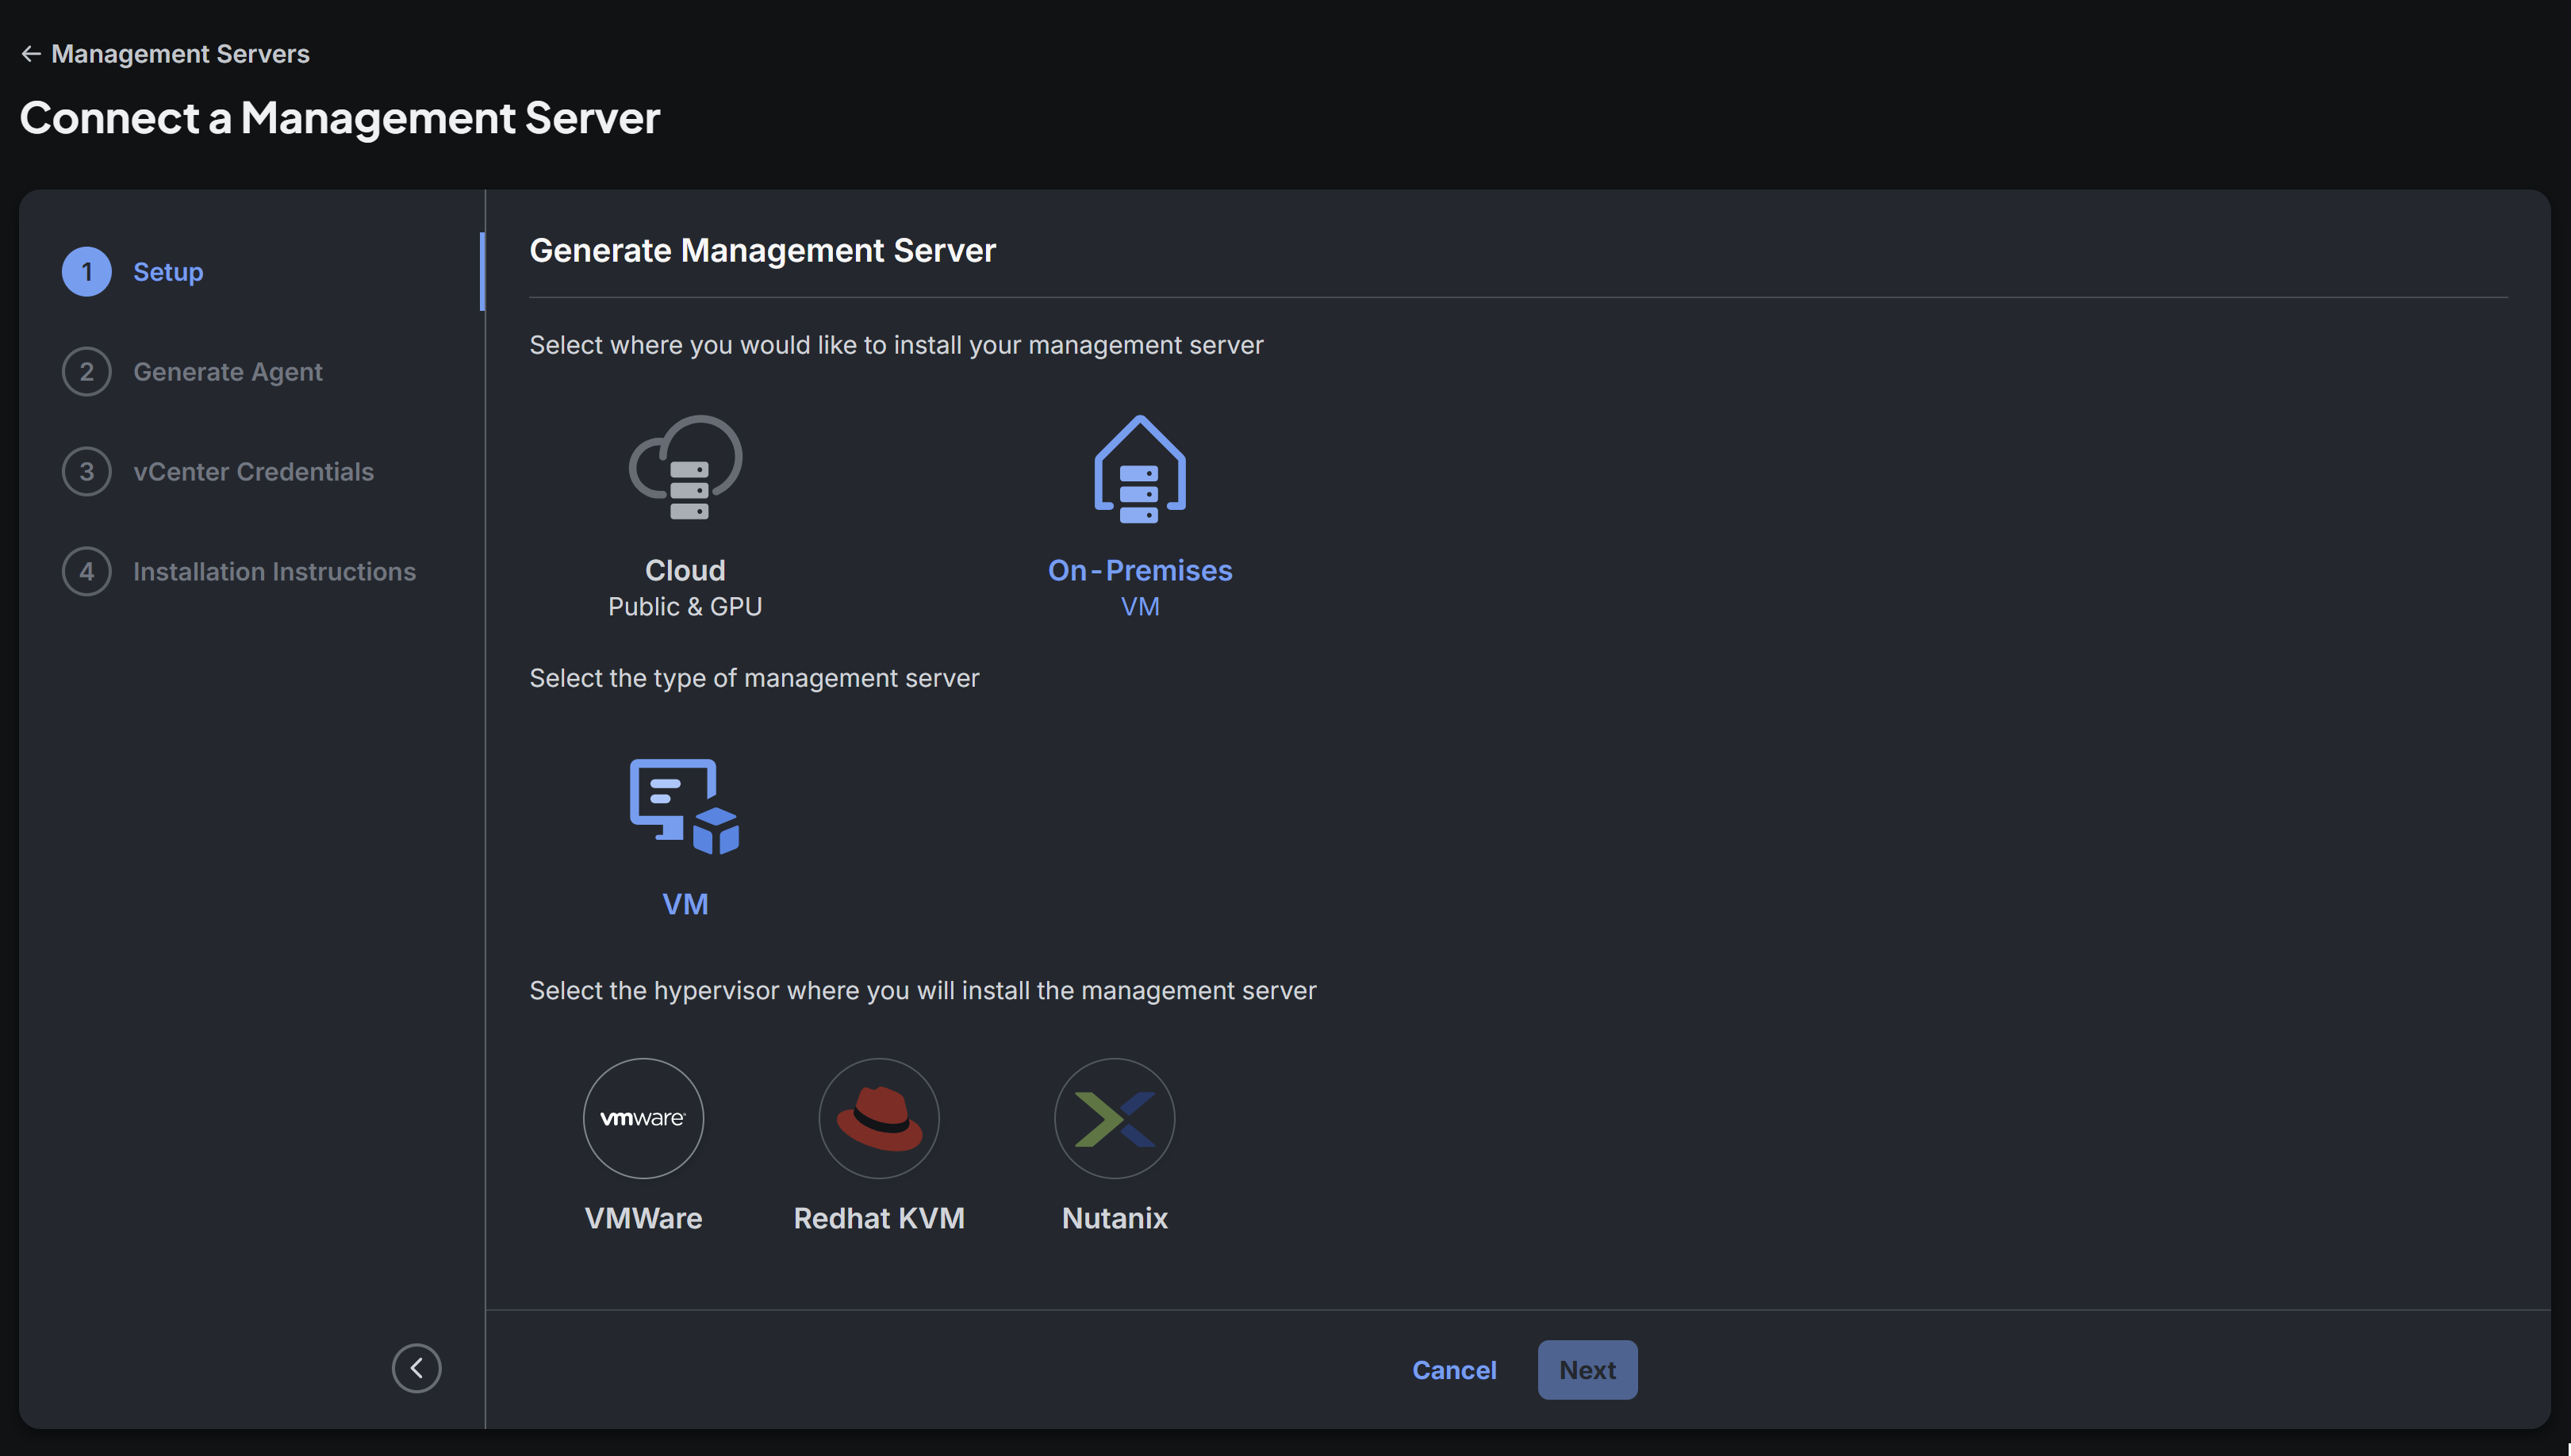
Make your selection and click Next.
The remaining steps depend on your choice. Installing on VMware adds a dedicated vCenter Credentials step (covered below) so Stack Automation can deploy the VM directly into your vSphere environment. Cloud installations skip that step and go straight to the installation instructions.
This guide follows the On-Premises → VM → VMWare path as an example.
Step #3: Generate the management server (Generate Agent)
In the Generate Agent step, fill in the details Stack Automation needs to build a deployment for your management server.
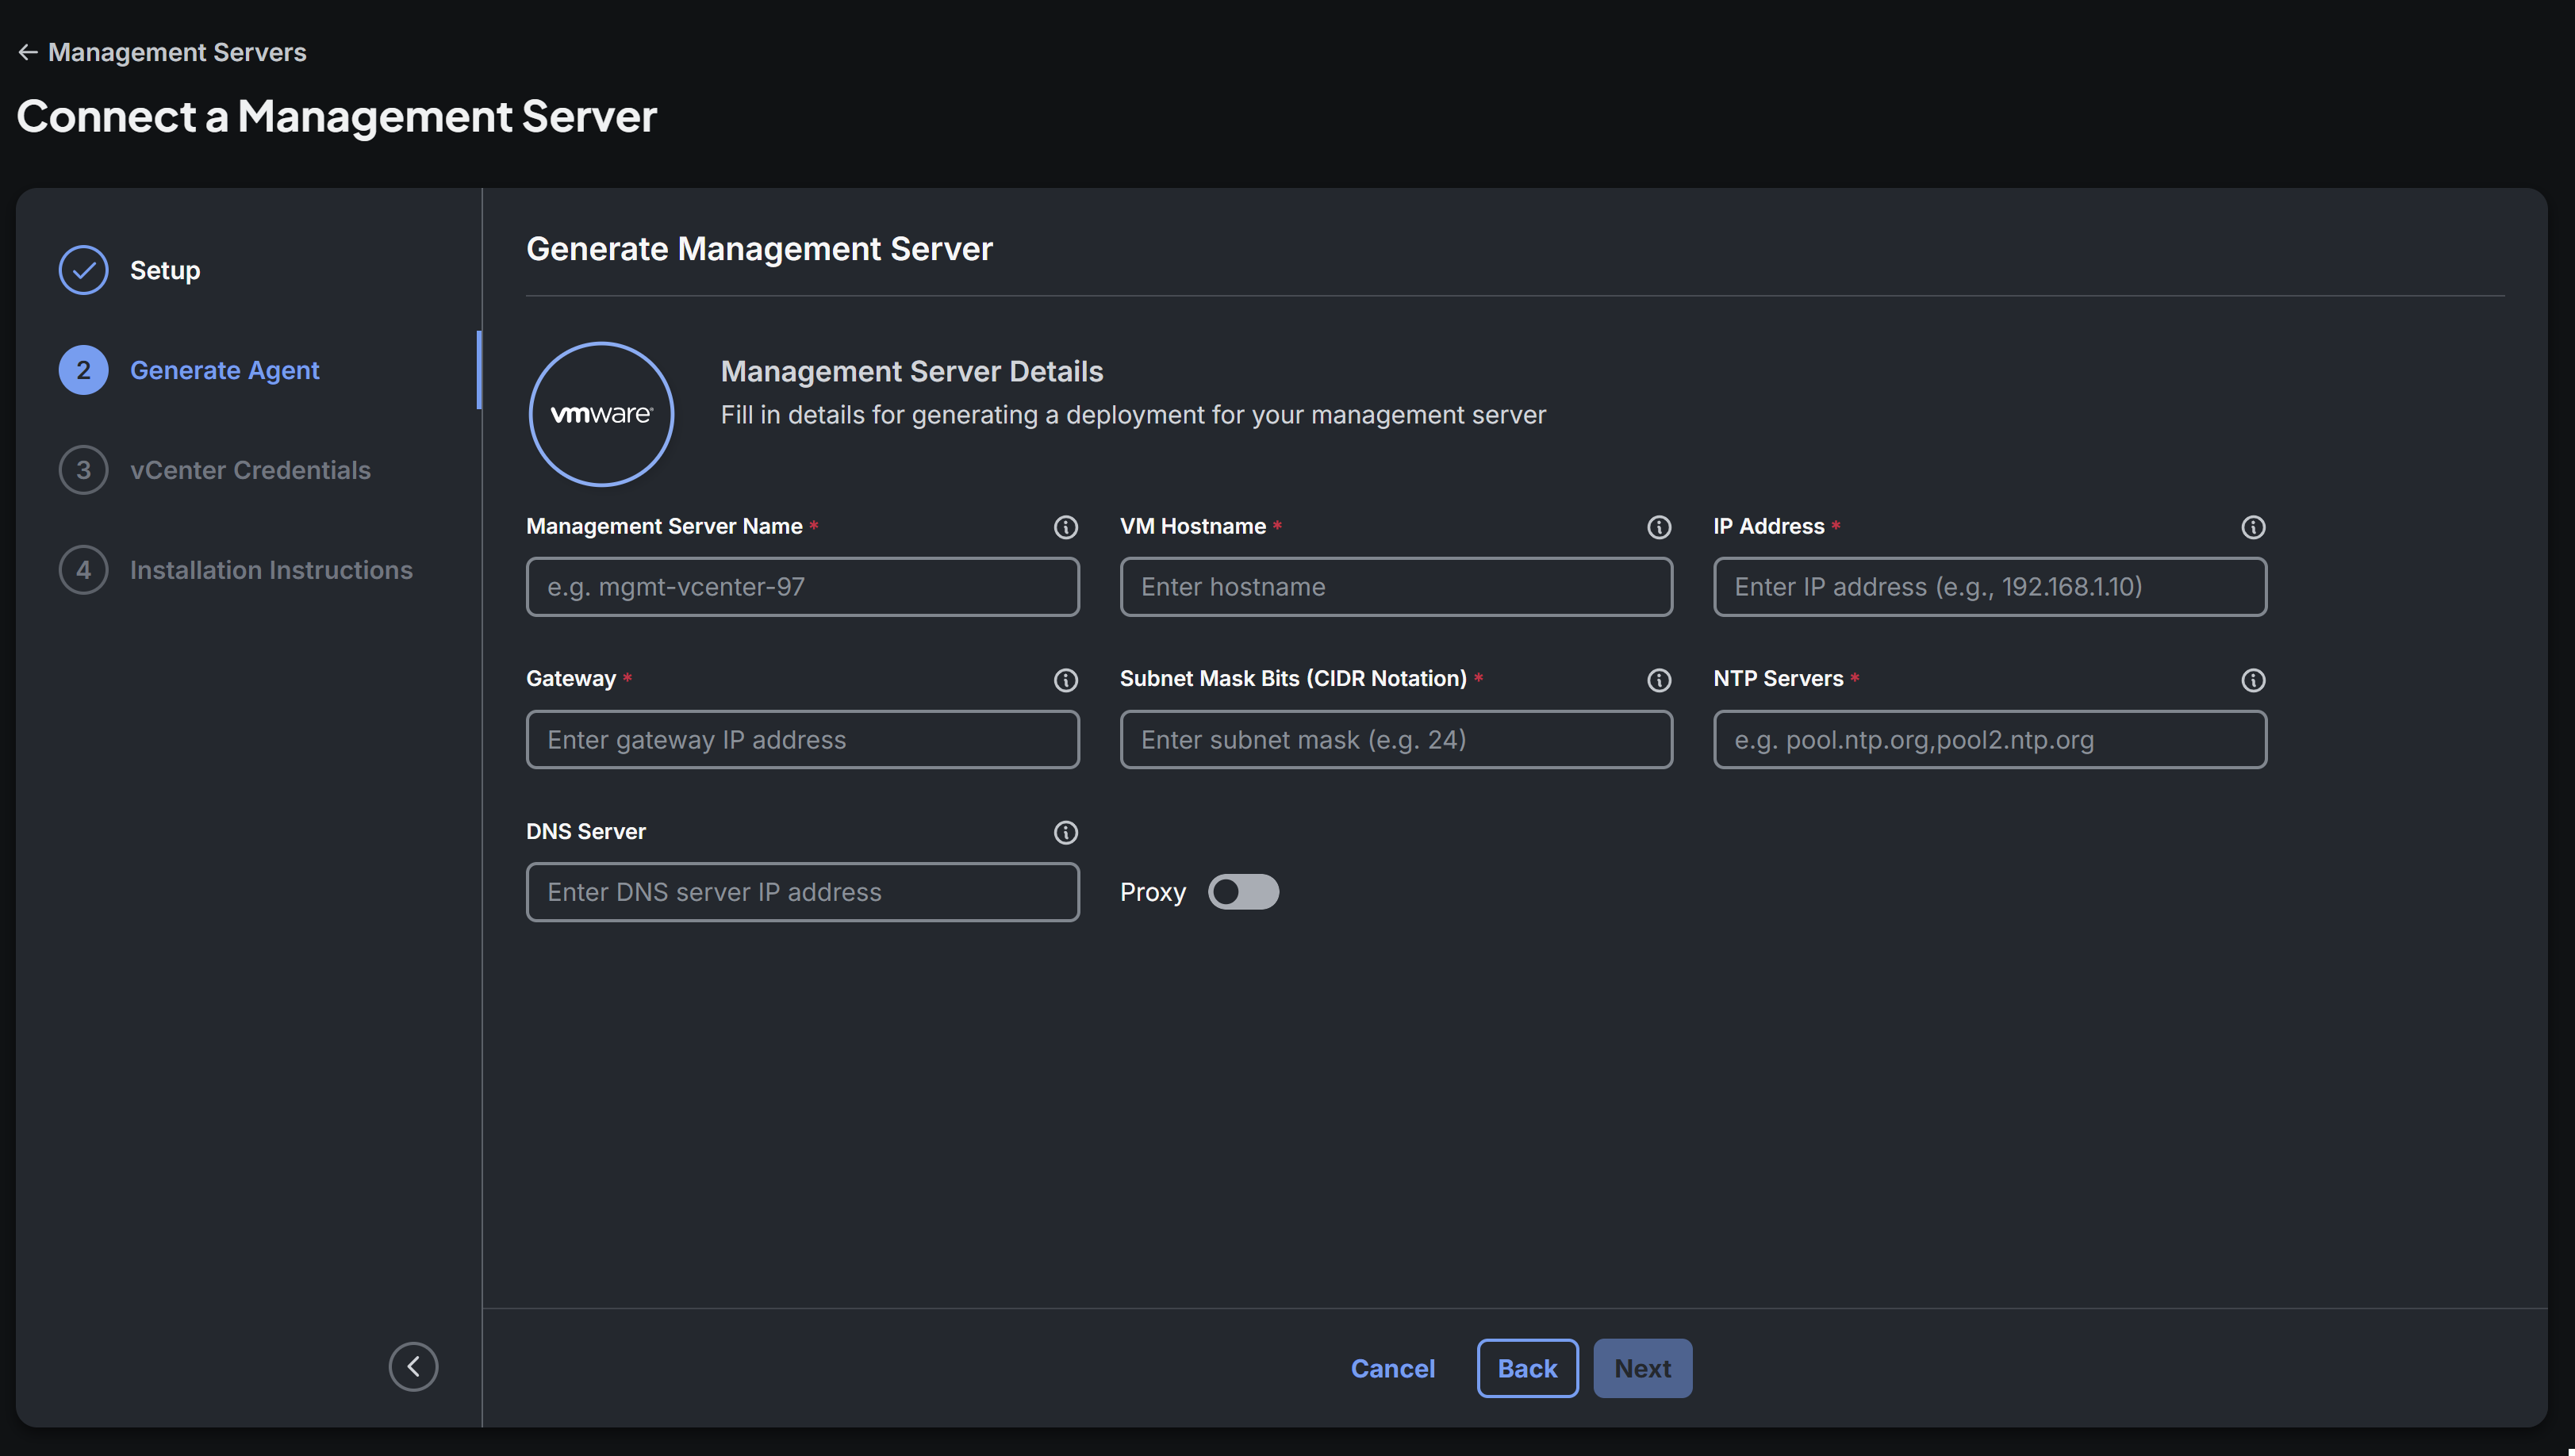
| Field | Required | Description | Example |
|---|---|---|---|
| Management Server Name | Yes | A unique, human-readable name for the management server. | mgmt-vcenter-97 |
| VM Hostname | Yes | The hostname to assign to the deployed virtual machine. | mgmt-vcenter-97 |
| IP Address | Yes | The static IP address the management server will use. | 192.168.1.10 |
| Gateway | Yes | The default gateway IP address for the VM's network. | 192.168.1.1 |
| Subnet Mask Bits (CIDR Notation) | Yes | The subnet mask expressed as CIDR bits. | 24 |
| NTP Servers | Yes | One or more NTP servers (comma-separated) used to keep the VM's clock in sync. | pool.ntp.org,pool2.ntp.org |
| DNS Server | No | The DNS server IP address the VM should use for name resolution. | 192.168.1.53 |
| Proxy | No | Toggle on to route the management server's outbound traffic through an HTTP/HTTPS proxy, then provide the proxy details. | — |
When all required fields are complete, click Next.
Hover over the ⓘ icon next to any field for inline guidance. Use a static IP that is reserved for the management server so its address does not change after deployment.
Step #4: Provide vCenter credentials (VMware only)
For the VMware path, the vCenter Credentials step collects the connection details Stack Automation uses to deploy the management-server VM directly into your vSphere environment — the vCenter address and the credentials of an account with permission to deploy and power on virtual machines, along with the target placement (such as datacenter, cluster/resource pool, datastore, and network).
Enter your vCenter details and click Next.
Credentials are used only to deploy and manage the management-server VM. Choose an account scoped to the target datacenter or cluster rather than a full administrator account where possible.
Step #5: Install the management server (Installation Instructions)
In the final Installation Instructions step, click Generate. Stack Automation produces the deployment package and instructions for your chosen target:
- For VMware / on-premises, this is a VM image (OVA/OVF) and the steps to deploy it into your hypervisor.
- For cloud targets, this is a command (for example a
kubectl-based command for Kubernetes) that you run against your environment.
Follow the generated instructions to deploy the management server.
It may take up to a couple of minutes for a freshly deployed management server to start up and register. Wait for the Connected indication before continuing.
Verify the connection
Return to Resources → Management Servers. Your new server should appear in the list with a green Connected status. If it still shows Disconnected after a few minutes, confirm that the VM is powered on and that it has outbound network access (and correct proxy settings, if configured) to reach your Stack Automation tenant.
🎉 That's it — your management server is connected and ready to deploy blueprints from the Solution Hub.
What's next (optional)
A connected management server is fully functional on its own, but to start deploying from blueprints you'll typically pair it with a space and a repository.
Associate the management server with a space
Spaces are logically separate areas that group management servers, repositories, and permitted users. To let a space deploy through your new management server:
- From the management server's actions menu (or the post-connection dialog), choose Associate to space.
- Select the target space.
- Set the default namespace and service account that Stack Automation will use to deploy workloads through this server. These defaults can be changed later in Resources → Management Servers.
Launch blueprints from a repository
Once a management server is associated with a space, you can connect a repository to that space, discover its automation assets, and generate blueprints from them. Publishing a blueprint to the space catalog lets end-users launch deployments — Stack Automation will execute those deployments through the associated management server.
For the full workflow, see the guides on creating a space, connecting a repository, and launching a deployment.